Ever since a lot of us were put under enhanced community quarantine (ECQ) because of the pandemic that’s happening, a lot of the DJs I know who used to have gigs in clubs and bars have now turned to streaming their DJ sets online. And together with the DJs, some of the bars I know are also getting DJs to play online on their respective social media presences. This will most likely be the new normal for a lot, if not all, of us working in the nightlife entertainment industry.
As far as streaming platforms, there are definitely a lot out there. There’s Facebook (of course), Instagram, Twitch, Mixcloud, Mixer, YouTube. You can even stream live on LinkedIn. As for me, I normally go live on Facebook. I have a Twitch channel but I haven’t been able to fully maximize that. I am also on Mixcloud and that’s something I’d like to focus more on in the coming days and months
I won’t be getting into the pros and cons of each platform and which one you should be getting on. That’s a topic for another post. And I have a feeling that that’s going to be a lengthy one too. Instead, let me lay out for you how I set things up on my end when I go online to stream.
Before I dive into it, please remember that this is my setup based on what I have here at home. The things you have may be different from what I have. Hopefully, you’ll be able to take ideas from this and apply it onto your own setup. If there are alternatives that I know of which, I think, may be more useable for you, I’ll mention those below.
Here. We. Go.
What I have.
To get you started on this streaming shenanigan, you’ll need several things.
CAMERA & TRIPOD.
You can use your dSLR, your mobile phone or your laptop’s built-in webcam or an external webcam. As for my setup, I use my old Canon 7D as my main camera. I can always revert back to my laptop’s built-in webcam. Also, if you’re using an external camera or even your phone as your camera, do make sure that you have a tripod where you can set it up. A steady shot is so much better for the viewers than a camera that’s jiggling around like a… well, you know, a shaky camera.
Also, you may need to have accompanying software for your camera so your streaming computer will be able to use the camera as a video source for the stream. Because I use an older camera, I resorted to using Camera Live and CamTwist.
BROADCASTING SOFTWARE.
There’s a slew of options out there. The more popular ones, because it’s free, are Open Broadcaster Software (OBS) and it’s cousin, Streamlabs OBS. If you have the money to burn, there’s Wirecast and Ecamm Live.
APPROPRIATE CABLES.
Let’s not forget about these, of course. I use a mini-USB to regular USB cable for the Canon 7D. I also have a USB-B to regular USB to connect my audio interface to my computer. If you don’t have an audio interface, you can just connect your audio source directly to your computer’s audio in port. Commonly, you’ll need a 3.5mm audio cable. You’ll need to double check the kind of audio out connections you have from your audio source. My Pioneer DDJ-RR DJ controller has a pair of 1/4-inch TRS output jacks so I just use a pair of regular 1/4-inch TRS cables since my audio interface can accept the other end of that cable as inputs. Your audio setup may be different, so double check.
STREAMING COMPUTER.
I use an old 2010 iMac that I got from my friend, Travis Monsod, as my streaming computer. Yes, it’s a decade old but it still does the job. There are time though, for more of convenience, I just use my trust 2013 Macbook Pro laptop as my streaming computer. If you only have one computer with you, then that’s pretty much what you’ll need to work with. If you can, on a Windows-based PC, upgrade your RAM and video card.
And if you’re on an Apple computer, that’s pretty much it. Especially if you’re on newer models where everything is baked-on for the sake of aesthetics.
HIGH SPEED INTERNET CONNECTION.
I have to stress this part here. You need to make sure that your internet connection has the necessary bandwidth for you to be able to stream decent quality video. If you plan to stream in 720p HD or 1080p HD, I’d recommend that your internet connection is at a minimum of 20Mbps UPLOAD. Why upload? Because you’re not downloading your live stream. You’re sending it to the internet which is basically an upload.
I have a PLDT HOME Fibr internet connection at 100Mbps download and averaging around 80 to 90Mbps of upload speed. It’s an awesome connection that’s to be expected from Ookla’s 2019 Speedtest Awards winner for fasted fixed network in the Philippines. Ookla is the company who runs the famous website Speedtest.net. If you’re not yet on a PLDT HOME Fibr connection, I highly recommend that you get on board.
What I did.
I won’t be getting into the nitty-gritty details at this point. I realize that we will all have differing systems and there might small but significant differences among us. I’ll just gloss over the steps I took. Please take it as a general guide.
- I installed first the applications (or software) I needed. In my case, these are Open Broadcaster Software (OBS), Camera Live and CamTwist.
- Set up my Canon 7D on the tripod, plugged in the USB cable into the camera and into the iMac. Turned on the camera.
- Launched Camera Live and CamTwist and set up the software as needed.
- Next, I launched OBS and set up the scenes and sources as needed. If you need a full tutorial for OBS, I recommend visiting EposVox’s YouTube channel. He has a full Master Class tutorial on OBS there.
- From this point on, it’s all about setting up your streaming platform and hitting that “Go Live” button on whatever platform you’re using. As for me, I go live on Facebook or Twitch or Mixcloud. This is where that fast and stable PLDT Home Fibr connection plays a key factor in letting me stream without a hiccup and without getting cut because of slow internet connection.
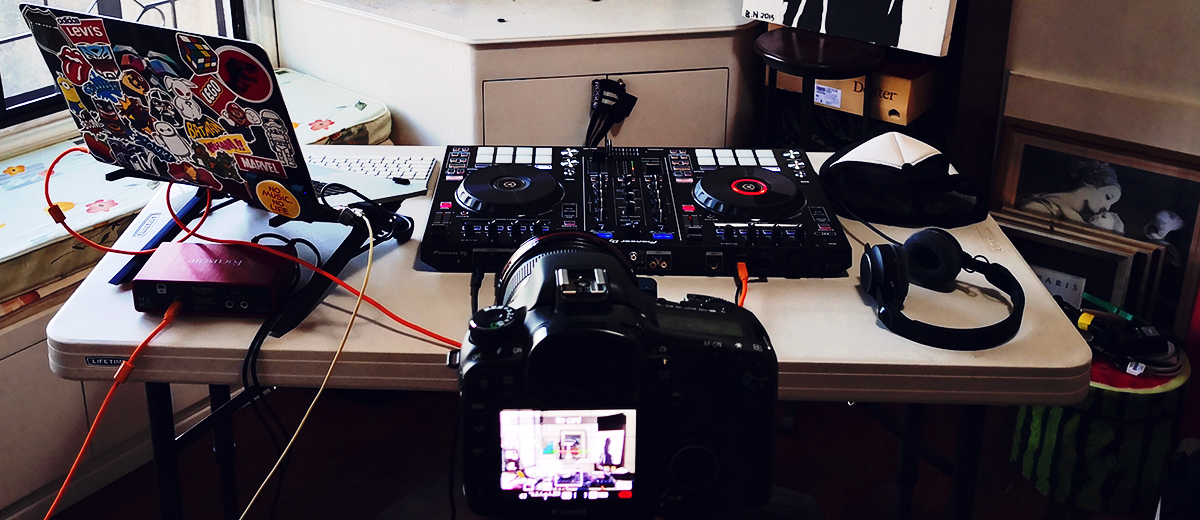
Here’s how my DJ streaming setup looks like from behind the camera.
Closing thoughts.
Going live on the internet via streaming is not as easy as one might think. It’s actually a challenge to put it all together. It’s a really hard challenge though. The simplest way of streaming yourself live is to pick up yoru mobile phone, open up Facebook or Instagram and go live on any of those two platforms. Of course, you’ll be limited to how you’d look and sound through your phone’s front-facing camera and built-in microphone. If you’re okay with that then the only limiting factor will be your internet connection.
However, if you’d like to take your streaming game one level higher, you’ll need to go through the hoops to get yourself to where you want to be. Better camera, proper broadcasting software, good content flow accentuated with the bells and whistles of video transitions, backgrounds and whatnot. And pushing it all out with a fast and stable fiber internet connection. And of course, we all gotta be consistent in pushing out content using your live stream platform.
But once you got the hard parts down, you’re pretty much set to go for your future streams. And hopefully, setting up and going live becomes second-nature for you.